Do not open a hard drive at home
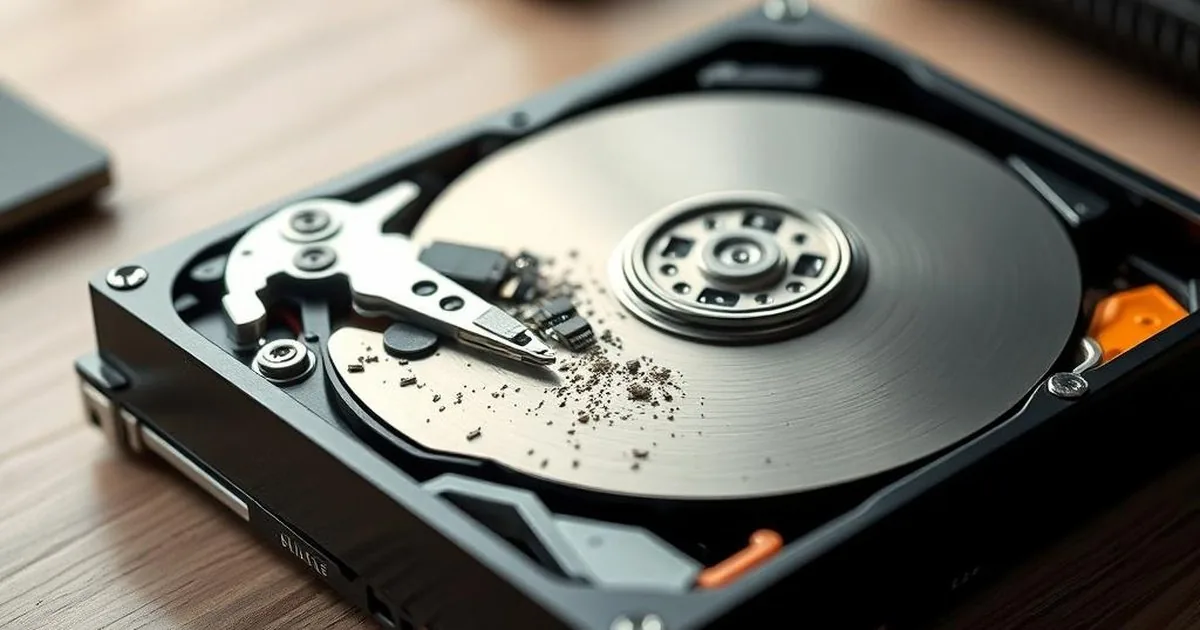
A hard drive starts clicking in a Warsaw flat, and a video online says the cover can be removed with a screwdriver. That is the moment to stop. Inside an HDD, one dust particle, one fingerprint or one wrong head movement can damage sectors that were still readable.
Opening an HDD outside controlled conditions can introduce contamination and increase the risk of platter surface damage. If the drive clicks, does not start or is not detected, unscrewing the enclosure at home usually makes the situation worse.
The safest first move is to stop testing, disconnect the media and write down the symptoms before diagnosis. This article explains why the inside of an HDD needs controlled conditions and when the right path is HDD data recovery.
Why opening a drive at home increases data risk
Hard-drive heads fly extremely close to the platters while the surface spins at thousands of revolutions per minute. A speck of dust, hair or tool mark can become an abrasive point. The next spin-up may turn a small mechanical fault into a platter scratch and close access to part of the data.
That is why a drive is opened only in controlled conditions, such as a cleanroom or laminar-flow workstation, and only when diagnosis says internal work is actually needed. If the drive has mechanical symptoms, choose professional recovery from platter drives instead of more live power-on tests.
Laboratory internal work is not just a clean room. It is diagnosis, compatible parts, firmware awareness, head-map decisions and imaging as soon as the drive can be read.
Typical home repair mistakes
The most common mistakes are removing the cover, touching the platters, moving the heads, shaking the drive and powering it again after the attempt. Each of these actions can increase damaged areas or make stable reading harder.
- Opening the top cover just to see what happened.
- Moving heads manually or touching platters.
- Trying random donor parts without firmware and preamp compatibility checks.
- Cleaning internal parts with household cloths, air spray or alcohol.
If the media has mechanical symptoms, the goal is not to repair the disk for normal use. The goal is to prepare it for the safest possible read. That decision should be made before the next spin-up, not after a series of home tests.
If a disk has weak sectors or works unstably, laboratory HDD data recovery is usually performed through sector-by-sector imaging.
What can happen after the cover is opened?
The drive may become contaminated, heads can be bent or misaligned, and the platters can be scratched during the next power-on. Even if the original fault was limited, the new damage can reduce the amount of recoverable data.
Opening a drive in poor conditions can lead to several unwanted effects. The main risk is the extremely sensitive platter surface where the data is stored. Even a tiny particle or hair can scratch it. Such damage is often irreversible and can turn years of work into permanently lost data.
Unscrewing an HDD also means interfering with precision components. A small wrong movement can affect heads, ramps, magnets or alignment. Even professional tools such as PC-3000 and donor-part procedures may not be enough after a careless internal intervention.
The decision to "just see what is inside" often ends with avoidable permanent damage. Curiosity is not a diagnostic method when the only copy of the files is on the platters.
When is opening a hard drive justified? Only when internal parts work is truly necessary and the environment is controlled. Laboratory conditions limit dust, hair and other contaminants that can damage platters and delicate components.
Internal HDD work should be done with appropriate filtration, tools and procedures, not on a desk and not inside an open computer case. Many hard-drive problems do not require opening the drive at all.
If internal access is necessary, it should be done by a qualified technician who has both the equipment and the knowledge to run a controlled process. That is the only realistic way to preserve the chance of repair and data recovery.
If the drive clicks, disappears from BIOS or freezes the computer, read how to recover data from a damaged HDD before taking another step.
What to do instead of opening an HDD at home
Power the drive off, protect it from shock and write down the symptoms: fall, clicking, beeping, repeated spin-up, burning smell, liquid exposure or earlier software scans. Do not run long scans and do not keep reconnecting it.
If the drive makes worrying sounds, disappears from the system or freezes the computer, disconnect it and do not continue testing. With platter drives, curiosity usually does more damage than the first symptom. Instead of unscrewing the cover, prepare the model, behaviour notes and decide whether this is a case for HDD data recovery or only an initial diagnosis.
Also note whether there were earlier CRC errors while copying files, a format prompt or head clicking. That context matters more to the lab than the fact that the cover has already been removed. The fewer random attempts after failure, the better the chance that the drive can still be read safely.
If the external USB enclosure may be the issue, ask before removing the drive. Some enclosures use encryption or sector translation, so a bare disk can look unreadable in another adapter.
When you need to act carefully
Be especially careful after a fall, clicking sounds, liquid exposure, repeated spin-up attempts or when the drive contains the only copy of the data. In those cases, every power-on test can change the recovery procedure.
If the platters were exposed, the drive was powered on after opening, or there are visible marks from touching the surface, do not return to home experiments. Protect the drive from more dust and transport it for diagnosis in the most stable condition possible.
Related materials can help you choose the next safe step: recovering data from a damaged HDD, what to do after HDD failure and contact with the laboratory.
If you want to assess the case safely
Prepare the model, capacity, symptoms, whether the drive was opened and whether it was powered on afterwards. That information helps the lab choose the least invasive first move.
If the storage contains important files and you do not want to risk more tests, go to contact or case submission and describe the device model, symptoms and priority data. You can also check typical data recovery pricing and go straight to HDD data recovery if this path matches the case.
Safety rule: if the drive has already been opened, do not power it on again and do not wipe or move anything inside.